SHARE WITH FRIENDS:
Nowadays, it is very difficult to find a business, office or even an apartment in a modern home without a personal home and tablets, smartphones, laptops and TVs. Almost all of the devices have the technical capability to work with a global network, as they work there, discuss business, take training courses, and spend their free time at various entertainment events.
But all of this provides a network protocol that connects the ‘access point’ with ‘customers’ and allows the exchange of data with the Internet and allows ordinary people to connect to ‘Wi-Fi’. However, to make effective use of this modern technology, you need to know the WiFi installation procedures. This article finds the user detailed instructions connect and set up Wi-Fi on your computer.
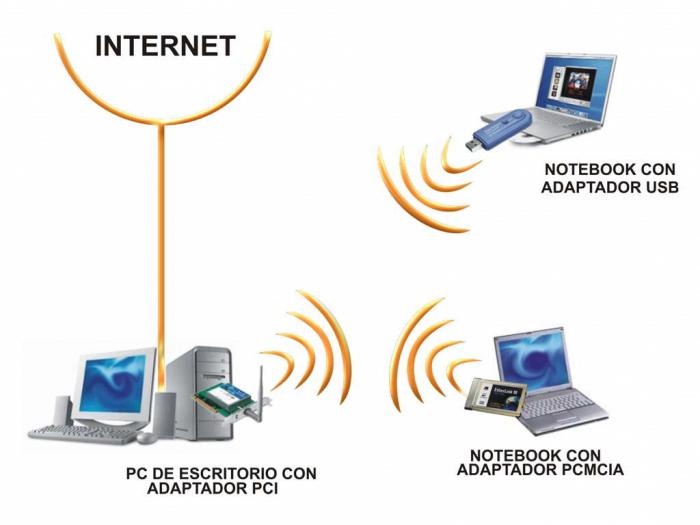
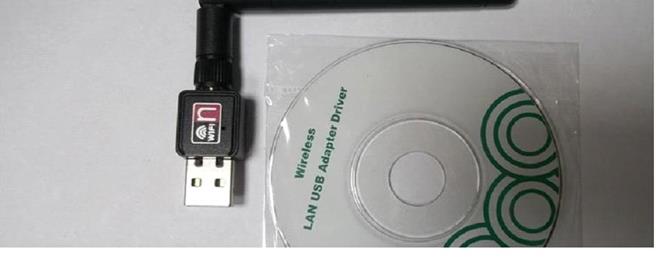
Wi-Fi computer receivers
The modern equipment at the plant is equipped with Wi-Fi modules. This means you can buy them online and unpack them. Therefore, problems are mainly caused by PC owners. It is solved by purchasing wirelessly, then installing and configuring a special adapter to ensure Wi-Fi signal reception.
 The following article has a step-by-step guide to tuning wireless network on the computer.
Wi-Fi modules are available in the following 2 options, depending on the installation methods:
-
Installed on the external ports of the computer;
-
Built-in system unit Personal information
The first option is the most popular with users because it is characterized by greater ease of installation and use. The connection to the computer is made via any usb port or usb cable.
The second option is required to install motherboard opening the system block, i.e. if the user does not have the required skills, it is better to purchase an external version of the device running through the external port.
 The next steps in setting up Wi-Fi receivers are the same.
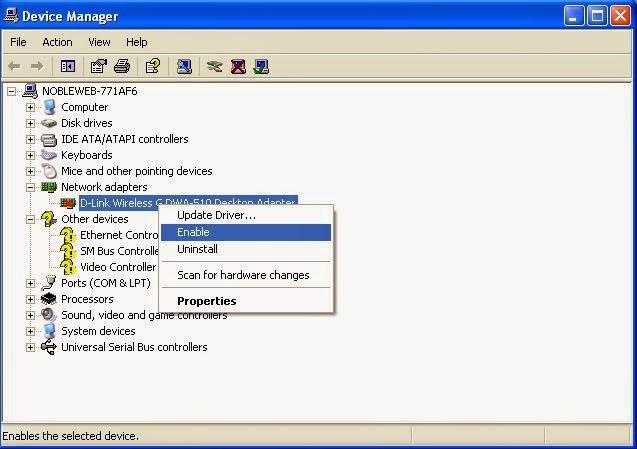
Software installation
That's all wireless adapter Published on CD. The CD contains drivers and utilities for the module to work perfectly. The installation process provided by the device manufacturer software optimized for all categories of users and intuitive. You just need to have step-by-step tips, read the contents of the pop-up windows and click the appropriate buttons, for example, “Next” and “Ok”.
 Some Wi-Fi modules are quickly recognized by modern computers and work well without installing the software that came with the adapter. However, installing original drivers is recommended, as universal software may not provide full network functionality.
Settings on a computer with Windows XP
-
Access the "Network Environment" via the "Start" button;
-
Then find the "Wireless" icon in the list of connections network connection“And bring up the context menu;
-
Click on the "Properties" line;
-
In the window that appears, open the "General" tab;
-
Click "Internet Protocol TCP / IP";
-
Then click the "Properties" button.
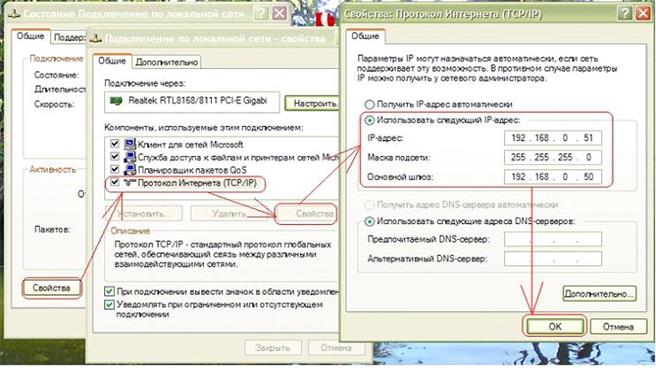 When your ISP requires you to work with static thread and DNS, you will need to select "Apply next thread" in the menu that appears. No change is required when the addresses are automatically accepted.
If you have specified the addresses you have specified, you must enter the following parameters in this section:
-
Investigate the IP phone from your ISP and enter it in the first field;
-
Enter "255.255.255.0" in the mask field;
-
In the third parameter "Gateway" you need to enter the address of the router (specified in the documentation of the device), for example, "192.168.1.1" or "192.168.0.1";
-
Then set the slider to the “on” position in the “Use the following DNS addresses” line, then enter the data into the main and backup DNS (you need to know this information through your ISP);
-
Then enter the "Wireless Networks" tab;
-
Check the "Use Windows for settings" box;
-
Click "Wireless Networks";
-
In the list that appears, select the user's router connection and click the "Connect" button;
-
Enter your name and password. Finished, now everything works!
How to install on a computer with Windows 7
There are two styles:
-
Manual installation;
-
In automatic mode.
If necessary, adjust manually, then perform the following sequence of actions:
-
Click the Network icon on the network;
-
Then at the Center for Network Management and Public Affairs;
-
Then click the "New Connection or Network Setup" button;
-
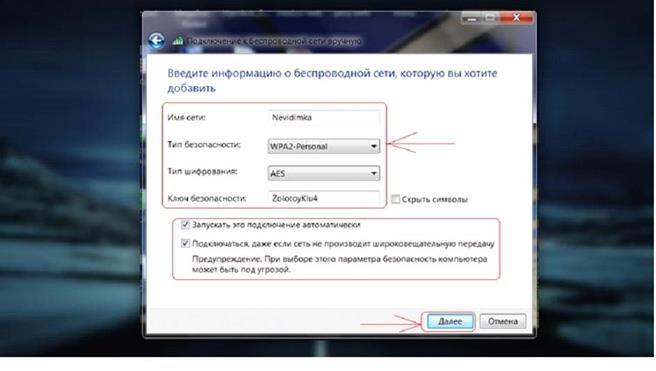
Check the "Manual wireless connection" box and click "Next";
-
In the window that appears, enter the network name and the remaining parameters cannot be changed. In the "Security Key" line you need to dial the network access code;
-
Check the "Start this connection automatically" box;
-
Click "OK".
 If you want to set up in automatic mode, then you need to perform the following sequence of actions:
How to set up in Windows 8?
To set up the following sequence:
-
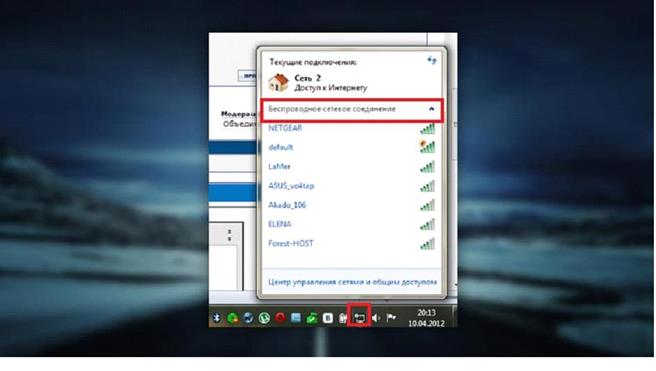
Click the Wi-Fi tray icon;
-
Select the configured user network from the list that appears and click the "Connect" button;
-
Then enter the name and password and click "Next";
-
A “Connection Completing” notification appears indicating that the user has managed to set up the connection correctly.
Setting up Wi-Fi at home is usually a big deal. You don’t want to tear up the phone with your provider simple instructions and everything needs to be worked out. Luckily, it takes about 15 minutes to set up a route from route to route.
This is very important!For example, we got a guide TP-LINK TL-WR840N . Software interfaces for installing different models tP-LINK routers may vary slightly (except for routers from other manufacturers). Look for the menu items you want, and if you have a picture, don’t worry about it, not in the picture instructions.
The fastest way to set up a Wi-Fi router is not with a disk. Although installation disks and comes complete with each router, this setup is not provided for everyone. We’re going the other way - let’s see how to set up the route manually.

Preparation
To connect a router successfully, you need to know the type and settings of your Internet connection:
-
IP address;
-
subnet mask;
-
access;
-
parol.
This information must be included in the Internet Services Provision Agreement. Are there any abnormalities in the contract or agreement mentioned above? Call technical support and find out.
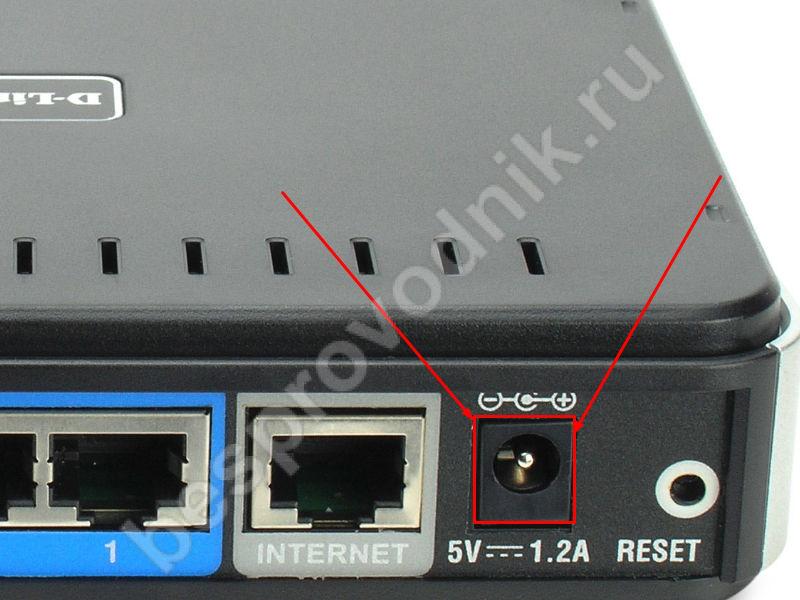
Connecting a router
-
The router is connected to the network (including the power cable - right?).
-
We press the TEN button. on the router (many routers are taken directly from the outlet, but in vain). In our case, there are both a power adapter and a button.
-
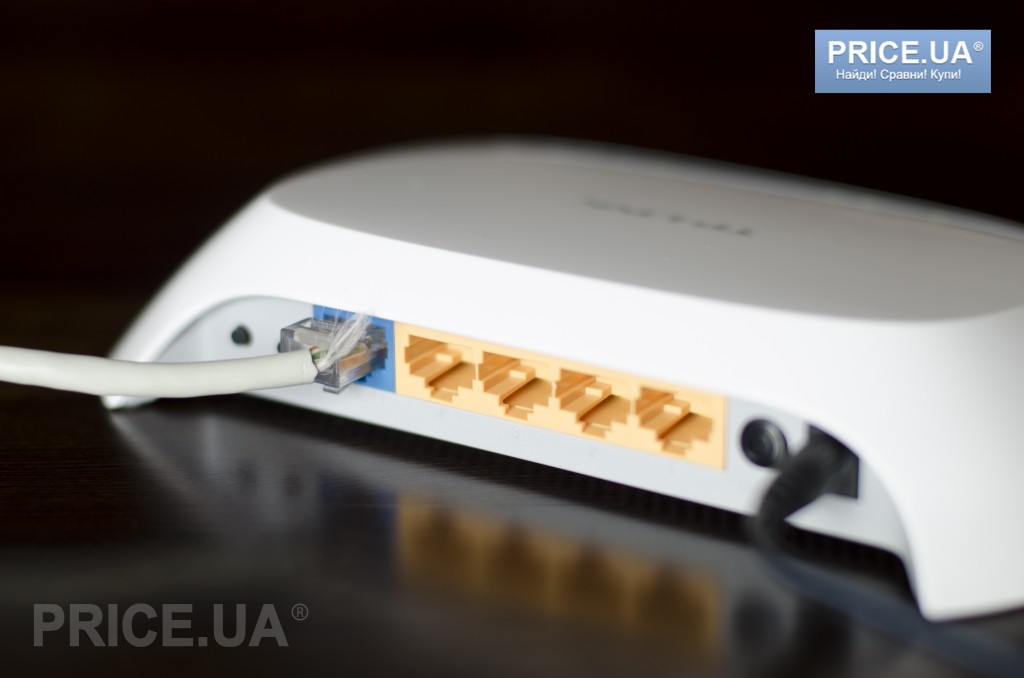
We can find it in the box network cable. On the one hand we need to connect it to the router (there are many ports on the router, you signed "LAN",kerakthe port is usually highlighted in a different color than the others). Others - to the computer's network card.
-
You need to enable automatic IP address retrieval. You can do this:
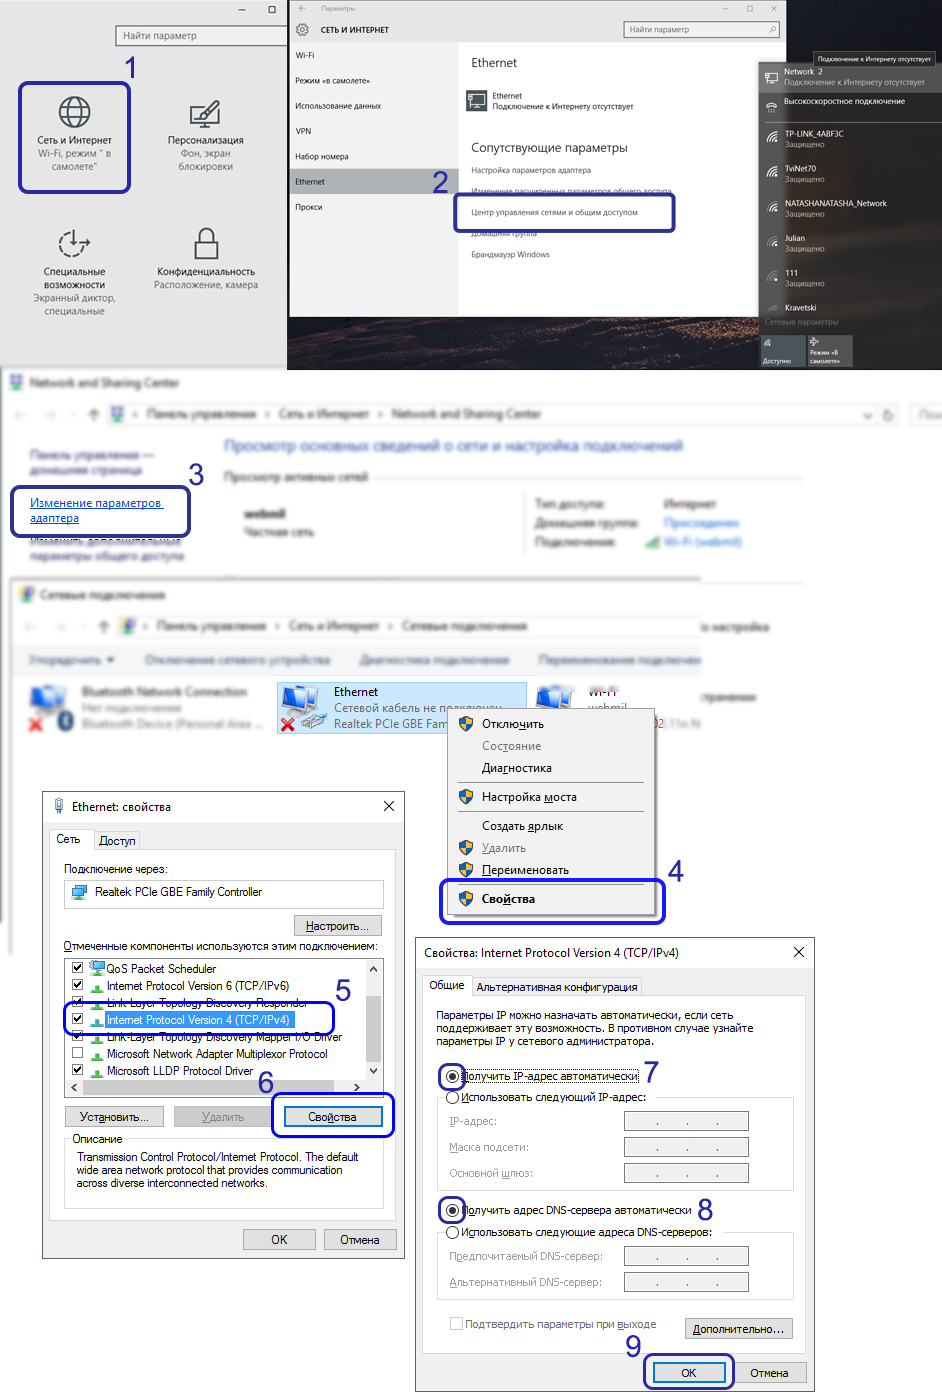
Router management
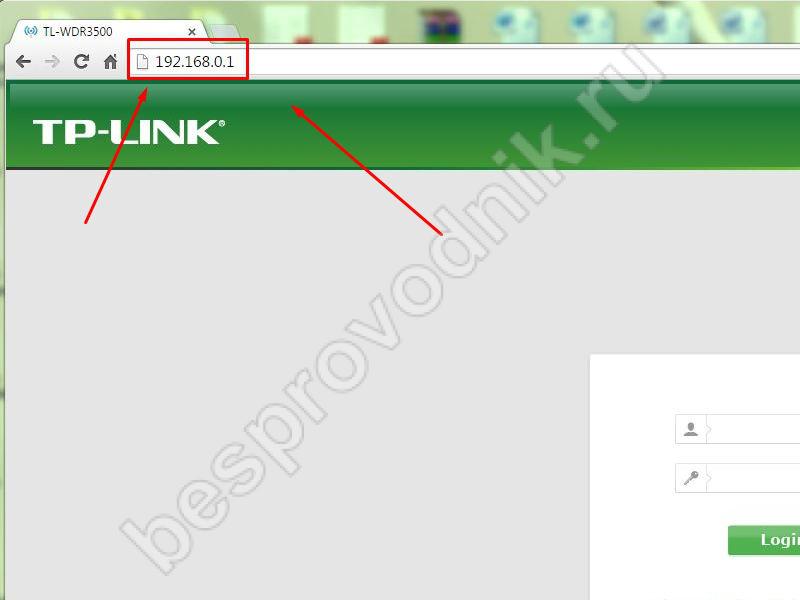
-
Open a browser on your computer (we used Google Chrome).
-
Enter the router address in the address bar (for Wi-Fi routertP-LINK - 192.168.0.1 or 192.168.1.1).
-
In the window that appears, enter your username and password. Unless otherwise specified at the bottom of the technical documentation or router, it is used as a standard on routers:
-
introduction:admin
-
password:admin
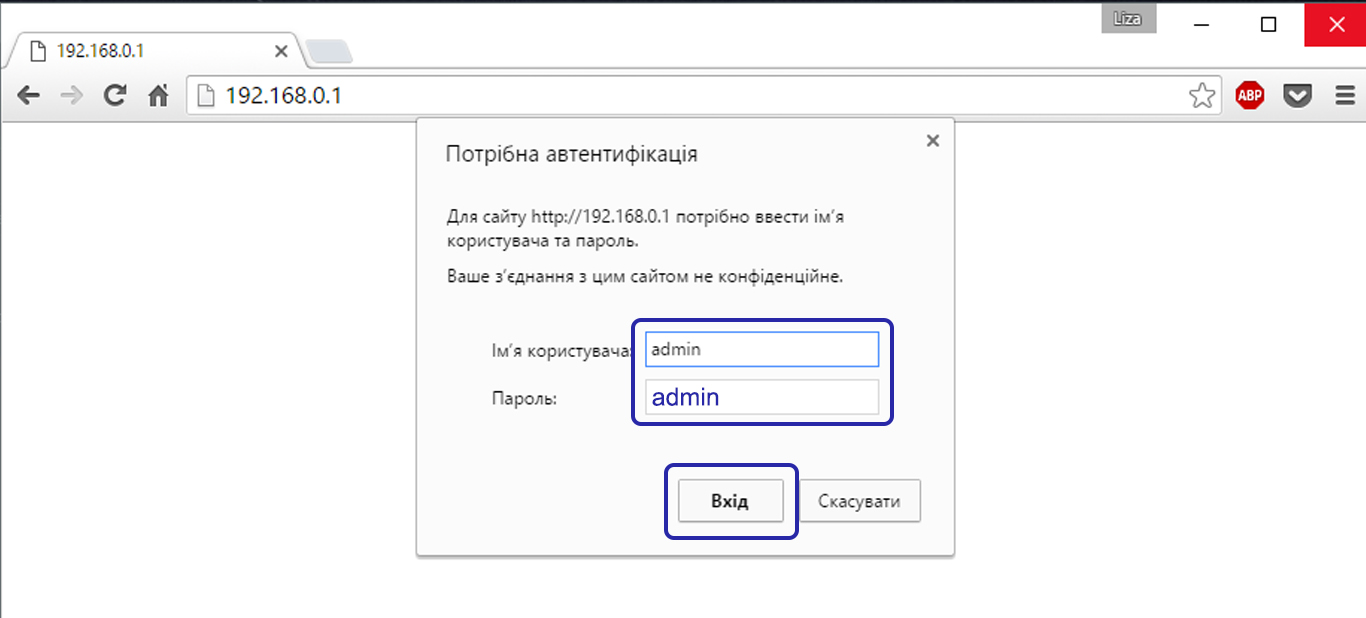
If you do everything right, this page is in front of you. The menu is always in English. On the left - the menu, in the center - the contents of the selected item on the left, and on the right - the description and the most important settings items.
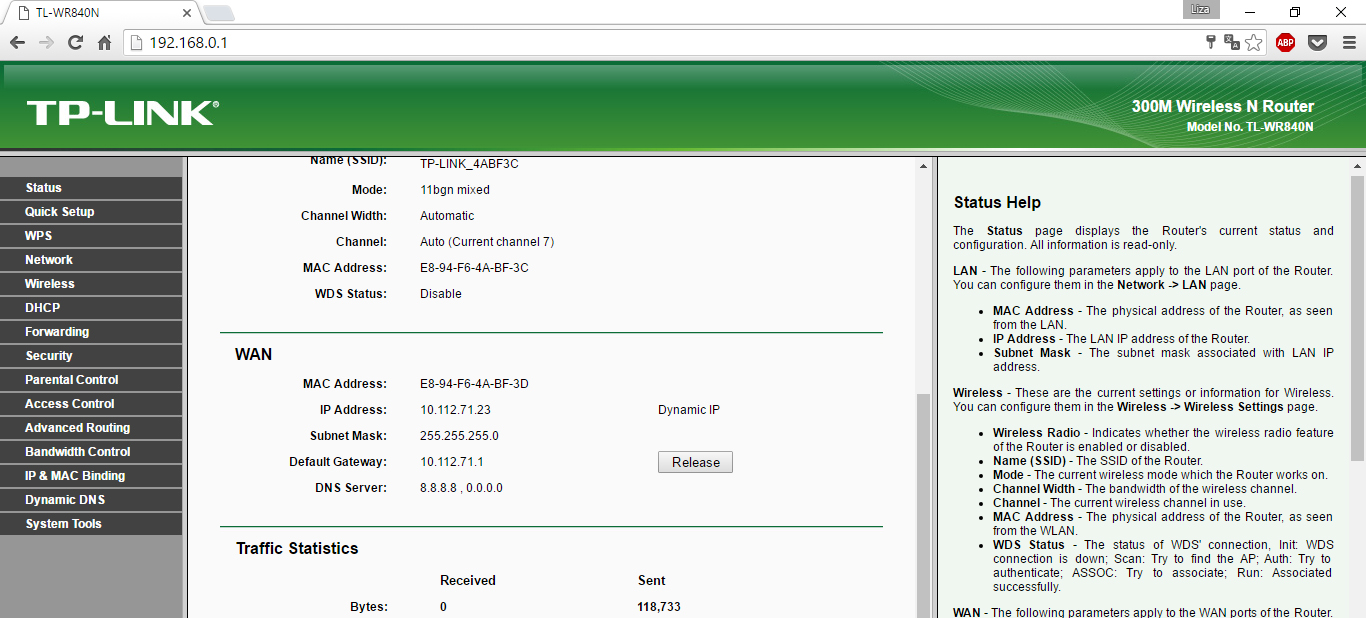
Setting up a Wi-Fi router at home
Don’t be in a hurry to scare you: you don’t have to have an English-Russian dictionary in every section. It is enough to put the earpiece at three points.
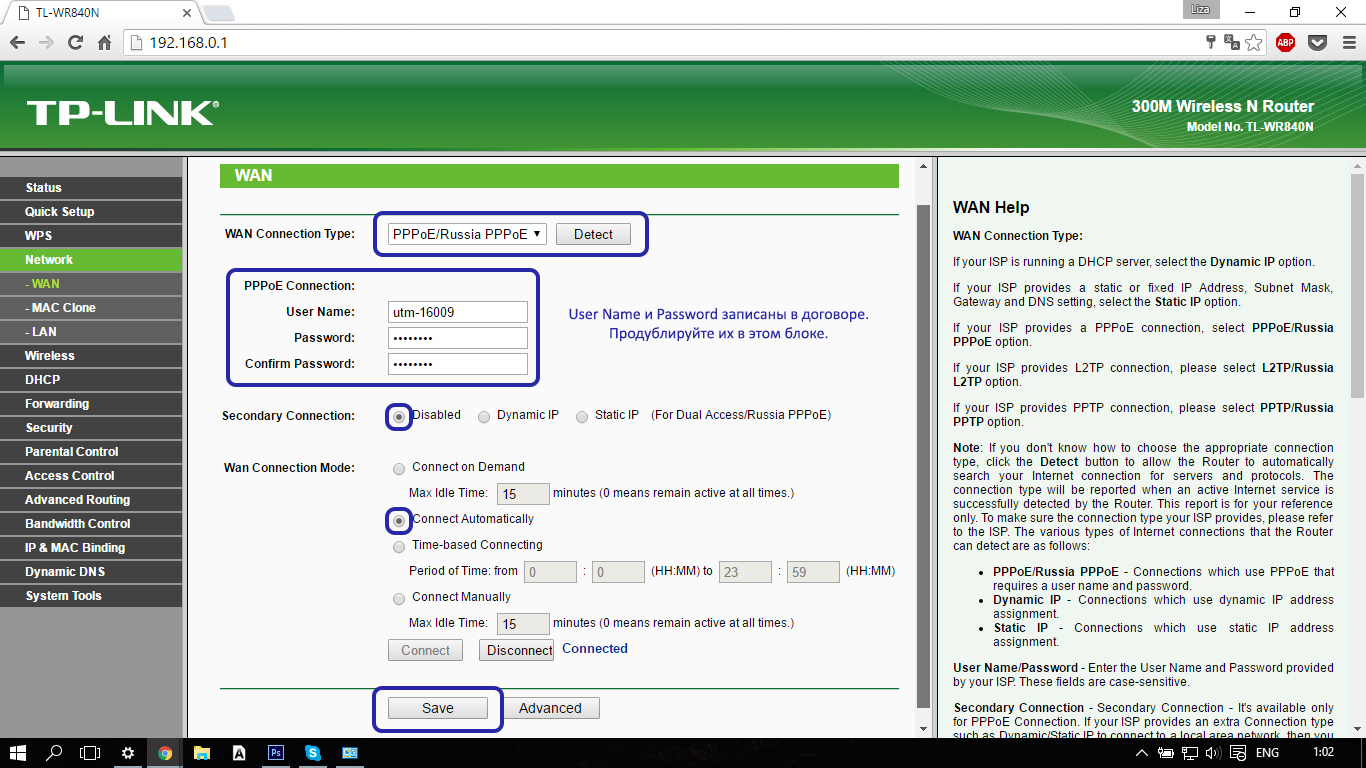
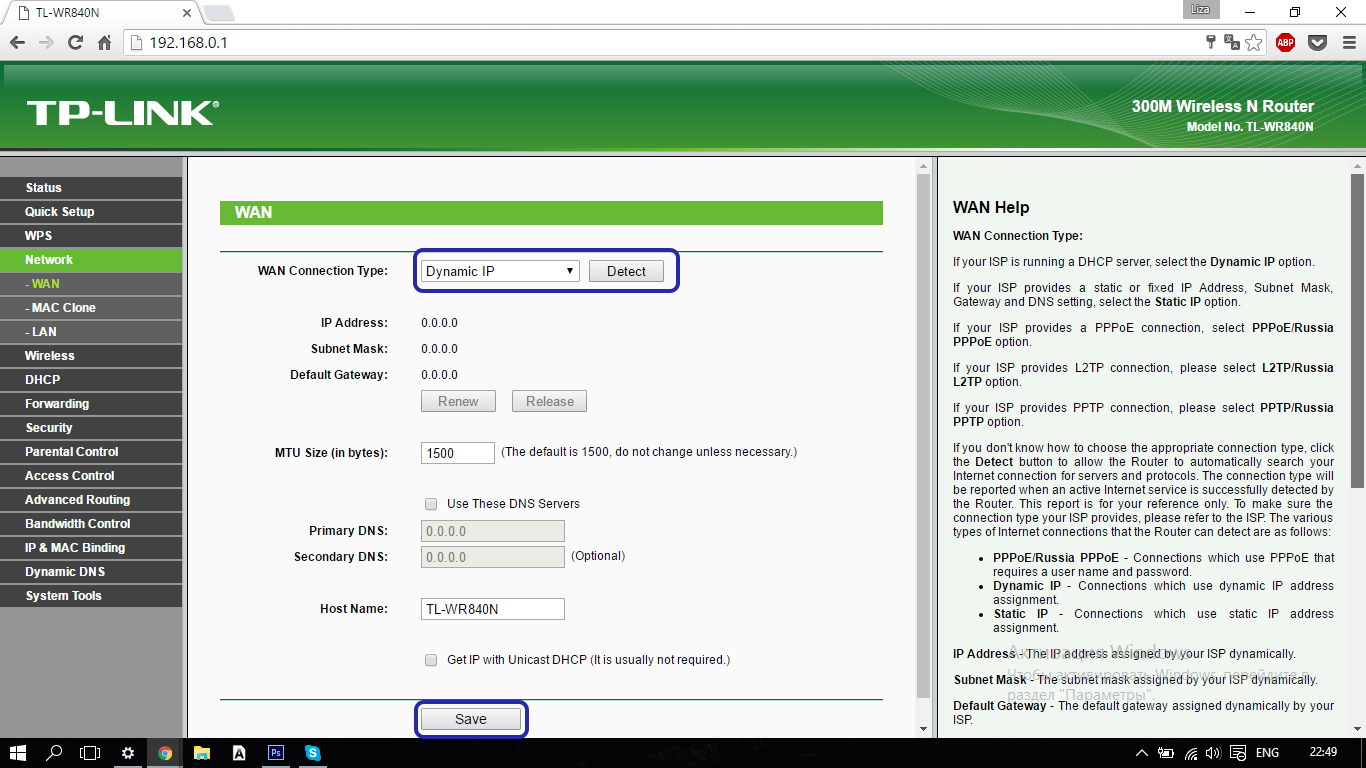
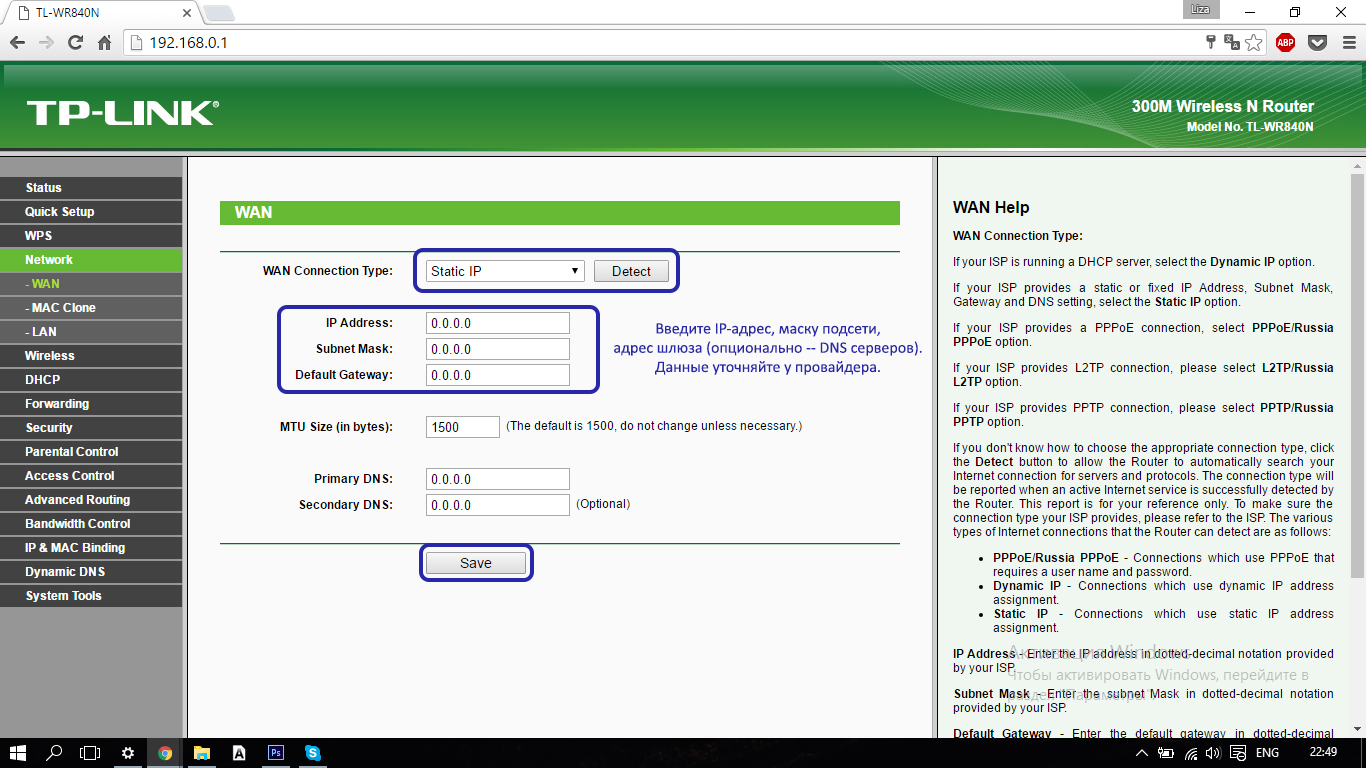
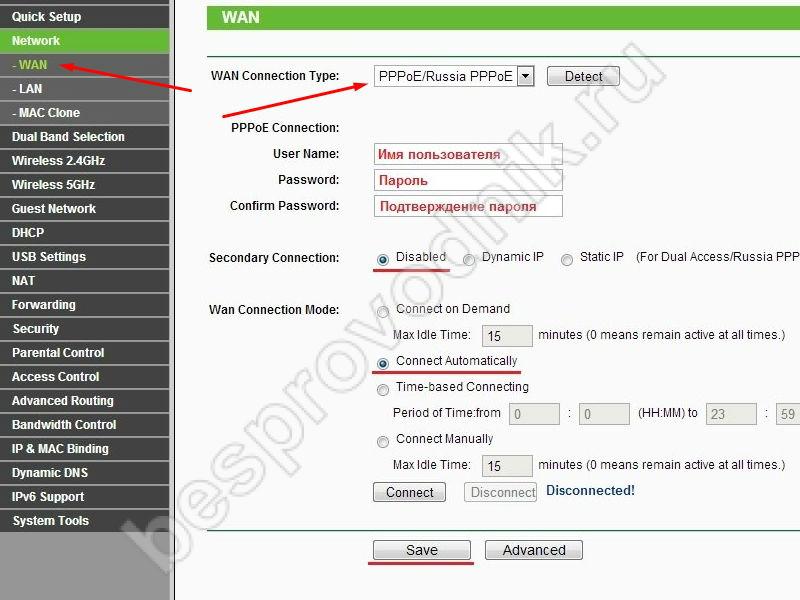
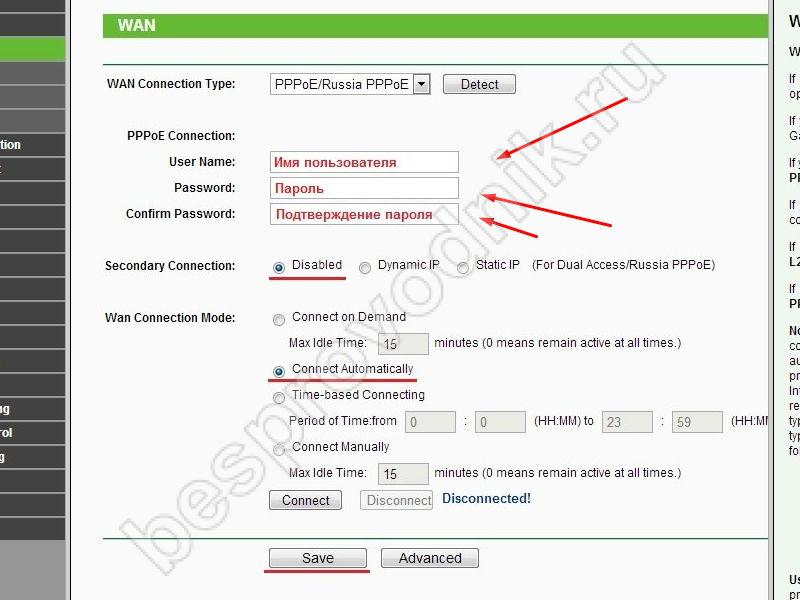
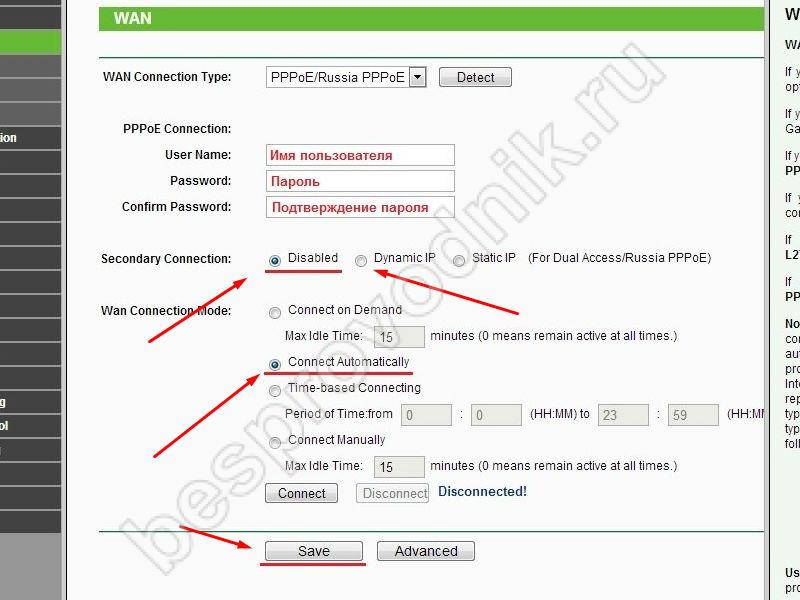
Section Networkpoint Wan. Select the connection type in the list - Dynamic IP, Static IP, PPPoE or PPTP (see agreement). In our case it is PPPoE. Each connection type requires configuration. Use the tips below to adjust the settings on the router and press the buttonSave(at the bottom of the page).
PPPoE
Dynamic IP
Static IP
PPTP
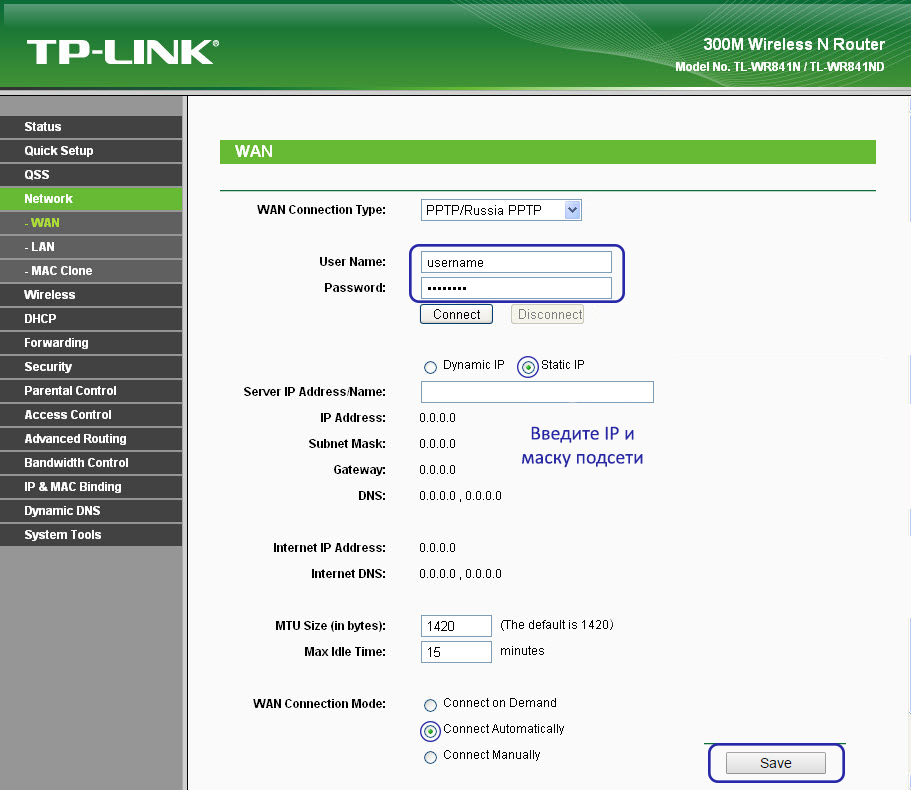
This is very important!The provider sometimes connects to the MAC address network card (A characteristic phenomenon for Dynamic and Static IP) because we move to the MAC Clone and live through the Clone MAC address. It did everything as you mentioned above, but why didn’t it work.
Set up a Wi-Fi network
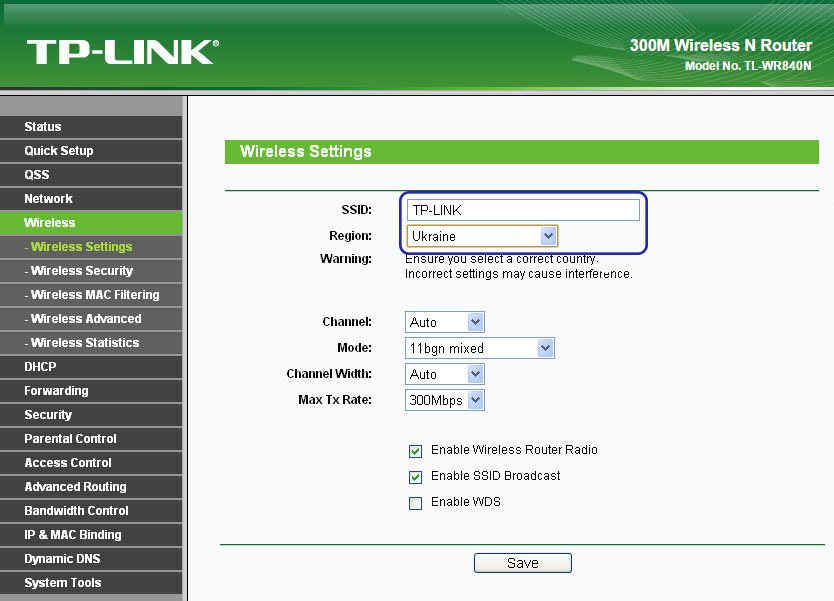
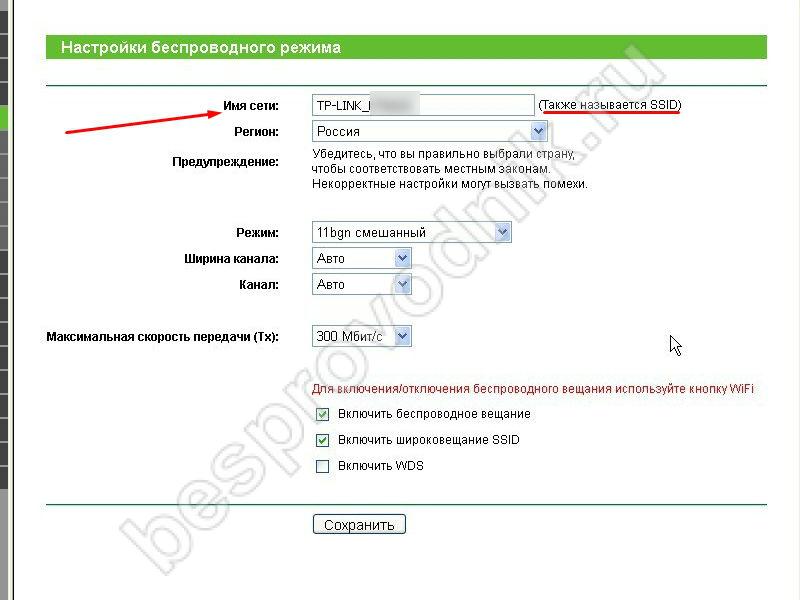
How to connect Wi-Fi? This will continue to set up the Wi-Fi network. Because we wentWireless— Settings.
Find our address in the list, we will have this network name (it is better not to change the name, but you can not leave it «-» - there may be problems with the compatibility with the name of the neighboring Wi-Fi ).
Among other things on this page, these menu items can be useful:
-
Turn on Wireless router Radio - Turns Wi-Fi on / off;
-
Enable SSID Distribution - Enable / disable Wi-Fi network view, if you disable this item, this network Not shown in general search for Wi-Fi networks (via SSID only).
The latter is not a way to hide from neighbors, so don’t rush to be wise with privacy.
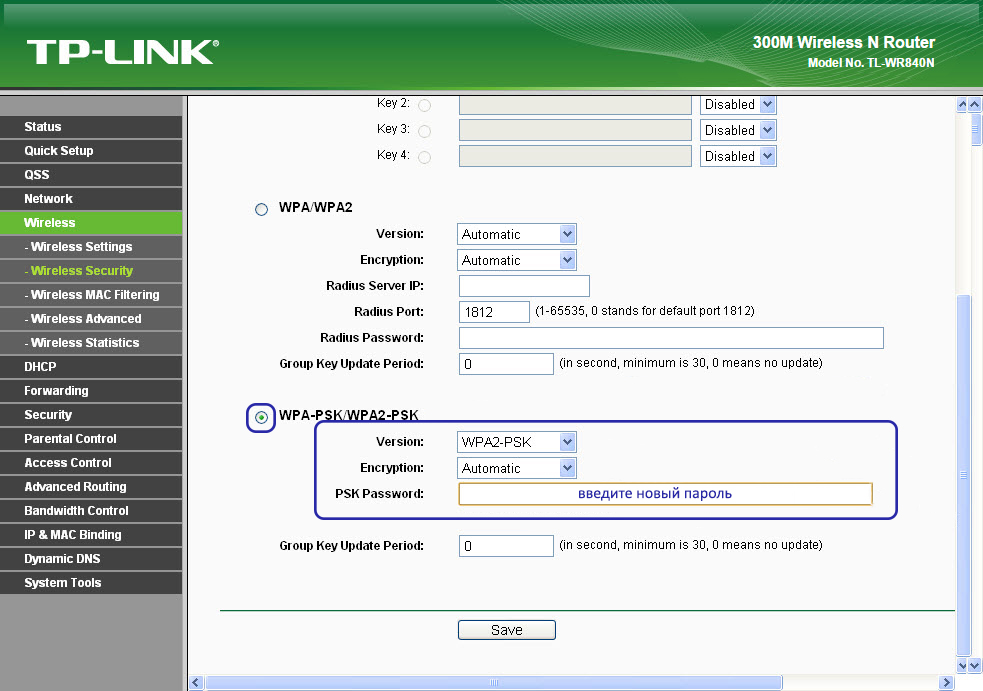
Set up Wi-Fi network security
We stay in our departmentWireless, go to the submenuSecurity. The optimal choice of parameters is shown in the figure below. For you - password for Wi-Fi only. We recommend that you write a contract (not to lose it) to provide Internet services.
Connection and performance
Of course, you can still customize local area network and change administrator passwords (administrator / administrator instructions on all routers). But that’s a bonus point. Most users can restart after rebooting the routing. Do this by clickingREBOOT in the pop-up window at the bottom of the message settings page.
Now we connect the cable from the provider to the allocated port and to the INTERNET port (which comes to your apartment via the internet). Other ports are for wired computers and laptops with wireless problems.
Now you know how to connect the router in 15 minutes. Over time, how many timers did you get?
PS Indicators
Not all routers are the same, but remember:
-
icon The systemdoes not need to burn;
-
Power- turn on only;
-
flashing averages - data is being exchanged, indicators are available - no network activity, they are off - no connection;
-
Internet - Flashes when connection is available - data is exchanged, cable connection is not switched off.
Or if you need a signal booster Wi-Fi adaptersyou can select the link below wireless devices to transfer information for any opportunity: http: //price.ua/catalog454.html.

This article will help answer the following questions: Setting up the wi-fi router properly, setting up an access point, and increasing clarity. If you trust the manufacturers of wi-fi equipment, setting up a wireless network (WLAN - wireless local area network) takes a few minutes. All you have to do is press a button and the device will make the connection. In fact, Wi-Fi routers are confusing even for experienced computer users. In most cases, it is usually a signal that you are just losing confidence. In this article, you will learn how to properly set up a wi-fi access point and make a reliable wireless connection to protect your network from unwanted visitors.
How to choose a Wi-Fi router or access point
Selecting a Wi-Fi router. Standard Wi-Fi is always a stumbling block for multimedia. Move quickly large files Or you can watch HD video over a wireless network, but when it complies with the 802.11n standard, it supports speeds of up to 300 Mbit / s. We also recommend reading about the new wireless network standard - 802.11 ac - to buy a device that has a backup for the future. If this is not necessary, any router from a reputable manufacturer (Netgear, Asus) should be selected , TP-Link or D-Link) complies with the 802.11 n standard high speed internet connections.
Wi-Fi adapters. Users use modern laptops or personal computers There is no need for additional equipment with a wireless integrated network adapter, and owners of older laptops should pay attention to the Wi-Fi modules on the USB bus or Wi-Fi card-bus adapters
How to find a Wi-Fi access point or Wi-Fi router
Typically, all 3 Wi-Fi network standards are 2,4 GHz. In this regard, several problems arise at once. One of them is explained by the fact that only Wi-Fi devices do not work in this frequency range. For example, wireless interfaces, wireless telephones, and microwave ovens also use this frequency in their work, which significantly increases the noise level. Another problem is related to the signal transmission environment: reinforced concrete structures, the human body - this signal quality deteriorates if it is located in their path. It is important to choose the right location so that there is an alarm throughout the entire area of the building. If the router is mounted as high as possible on the wall, the connection will work well. In addition, the router should not be behind a computer or other device to prevent radio waves coming directly from the metal housing that are doing a strong job. It is also very important that the router antennas are positioned correctly. In most cases, more coverage can be obtained if they are steered in a vertical direction.
Connect and configure a Wi-Fi router (access point) for the local (internal) network
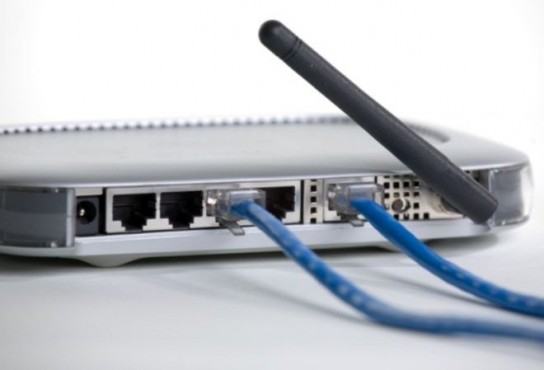
Use a network cable to connect the computer and router (usually you only use 3-5 of them for the external network, they are located and signed nearby). You need to make sure you have a computer connected to your file router (in the taskbar tray, the connection icon is lit).
Then you need to set the following settings for the properties of this connection:
-
IP address: 192.168.0.2
-
Subnet complex: 255.255.255.0
-
Main gateway: 192.168.0.1
-
DNS: 192.168.0.1
 If you find other parameters in the manual, you need to adjust them. Close command line most PC (in the window that opens for Windows XP - run - click «cmd» or enter Start and «cmd» in the search bar). Then type 192.168.0.1 ping in the drop-down command line. If the packages came from 192.168.0.1, then you did everything right. If there is no response and we see a message about the wait time, then try changing IP 192.168.0.1 and 192.168.0.2 to 192.168.1.1 and 192.168.1.2 and then pinging the address 192.168.1.1 see If you are still not working, review the manual to understand which router received the IP address on the internal interface.
It is also recommended to check if the network cable on the router is connected or if a crossover cable is not used. In the Wi-Fi router connection guide, if you can't find this section or there is no router, you should check the addresses 192.168.0.1 or http://192.168.1.1, ping the address we managed to warm up. Open the router settings page in your computer's browser. If you try to connect the router yourself, you will need to reset the settings using the “Reset” button on the back panel. Also check the same addresses, but with a secure protocol instead of http: //, https: //.
If nothing is specified in the instructions, you will be prompted on the page that opens for you to enter your login and password wi-fi connection a router, then a pair of administrator / passwords or an administrator / administrator should be tried - these are the most common pairs and they are found on almost all popular router models. After entering the control mode in the message settings section, select Russian so that everything remains clear, if any.
Redirecting packets on Wi-Fi routers is often allowed for the system interface, so you can already turn on additional computers and connect them from other sockets. internal networkstart using the internal network.
Setting up a Wi-Fi router
Below we will look at how to enter data to connect to the Internet using the example of an Internet Wi-Fi router, and now go to the settings section "Wireless Settings" or "Wireless", "Wi-Fi" and so on.
Now yours home network Name the Wi-Fi in "Name (SSID)". Under this heading, the wireless network is listed. existing networks on another device. Select your region (European-American installation has a long distance that is prohibited for us). You need to set the value from the “Channel” column to “Auto”, then your Wi-Fi router will be analyzed over the air and the least noisy channel will be used. Confirm the settings by clicking the "Apply" button.
Wireless security
 The network has been set up and has now chosen protection. It can be without any strong password to switch without an internet connection. In defense wi-fi network There are three basic encryption methods: WEP, WPA, and WPA2. In other words, they are all vulnerable, but with our help, your computer will be reliably protected from hackers. WEP encryption is very unreliable - it is recommended not to use it. WPA (Wi-Fi Protected Access - Encrypted Access) encryption based on AES encryption method is very reliable and problematic for cracking. The hacker will have to choose the keys for many years or require a computer that will increase the available analogues by a larger order.
More suggestions good protection WPA2. True, hackers were able to find space here, but the cost of insults is very high. However, these protection methods require a dedicated authorization server (RADIUS) that is not used in a small office or home network. They have encryption using WPA and WPA2 with predefined keys. To use them in the "Wireless Settings" tab, you need to enable "WPA-PSK (TKIP)" or "WPA2-PSK (AES)". When security requires encryption, you will need to set a password - it is not recommended to use at least fifteen characters in relation to it. Then confirm the login by clicking the "Apply" button.
Optional settings of Wi-Fi router
Each device on the network is equipped with its own MAC (Media Access Control) network address. You need to record the addresses of the devices you know on the router, others should not have access to the router. To do this, click the "Advanced" button in the "Wireless Settings" tab in the menu and select "Permission to Install" there. You will get a list of connected devices. Explore MAC wi-fi address a module running on a laptop or Wi-Fi network card on a computer, just type “ipconfig / all” at the command line. Then select the computers for which you want to open free access and click "Add". Now you need to check the box next to “Access control enabled”, click “Apply” and the protected network is ready from hackers. Keep in mind that once the wireless connection is set up on the client computers, all of this will be done better.
Go through the web interface of the Wi-Fi router and set up the network on your device using the following settings:
-
IP - from a range of free addresses
-
Maska - 255.255.255.0
-
Gateway - 192.168. (0-1) .1
Specify the WEP-encryption method, as well as the type of WPA-PSK and TKIP authentication in the network authorization settings. Enter the password from the network and connect.
Set up the Internet on a Wi-Fi router or set up an external network
 If we need to distribute the Internet over an internal network, we need to connect the network cable to the external interface on the Wi-Fi router via the Internet (usually the external interface is slightly different from the rest and the WAN is signed).
Then, in the router settings, specify the settings of your provider's external interface: as a rule, they are contract or call technical support. You should not forget about DNS - of course you need to cache the DNS server on the router or in most cases configure it in the DNS tunnel. You should also make sure that packet sharing between interfaces is allowed, if any, then it is already available on your internal network of the Internet.
It should be noted that the latest models of Wi-Fi routers and some of the earlier ones (e.g. Asus) have the ability to work with the PPPoE protocol, which is becoming increasingly common with providers. If you have such an Internet, then you need to make sure that the router supports PPPoE. On this page, we’ve outlined the basic ways to connect to the Internet to help you identify yourself.
Again, we forgot the memorable button, which answers the question of how to reset the password on the router if I forgot the old password. On each router there is a “Reset” button, after you press it while the router itself is running, it will restart and all settings will be reset to the original devices.
Setting up a Wi-Fi router. Wi-Fi network troubleshooting
Why not want to transfer Wi-Fi data? You connect to a Wi-Fi network, but the site cannot display the browser. Let’s take a look at the solution for exiting this WLAN.
The main problem is weak signal Wi-Fi connections. In some cases, WLAN transmits data 1,5-2 times faster and always bad signalregardless of where the antenna is located. The reason: your network has a different WLAN that operates on the same frequency. The 802.11b / g standard has a total of 2,4 channels of 13 GHz to ensure that multiple radio networks are available side by side. Most routers are tuned to the sixth or eleventh channel. Can be found with free software It recognizes NetStumbler and neighboring WLANs and you can see what channels they are working on. Download the program from the official site and start searching. After that, you will see the networks around you. Now put your WLAN on one of the channels that do not belong to this network through the web configuration of the router and check if the signal is improved.
Over time, the question arises about the installation of every modern Wi-Fi router or modem. This process requires:
-
wired internet connection;
-
Computer or laptop;
-
wireless router;
-
Connect the cable to the network card.
Setting up a Wi-Fi router
How to set up the Internet properly through a home Wi-Fi router? You must connect the device first.
Connect and configure wi-fi router Visualize this video for distribution. will help.
Connect via web interface
Now almost all network routers are managed through a web interface. Therefore, you should consider how to set up a Wi-Fi router at home through a computer browser. To use the program, you must first enter it. To this end, we do the following:
Once authorized, the received router settings and configuration will be available. Each manufacturer has created its own unique interface, so it may vary depending on the brand of wireless device. In this case, the essence of each program is the same and the control is sensitively clear.
Setting the basic parameters
In the Wan / Basic settings / or similar settings, the following parameters must be set:
-
connection type
-
username and password
-
iP settings
-
connection mode
The pPPoE connection type currently used can be found in the contract with the provider or support service to determine the type.
Enter the login and password in the documents provided at the time of signing the contract.
Depending on the conditions provided by the operator, the IP settings are omitted from Off or Dynamic IP.
The connection mode is set to Auto, so devices can connect to it automatically and at any time. Remember to save the settings! =)
Then go to set up a Wi-Fi connection
Open the Wireless Networks / WiFI app or something similar.
On the Wireless Network Basic Settings tab, we need to specify
-
Connection type
-
Network mode
-
SSID is the name of the wireless network
-
Channel
The connection type is usually defined as an “access point” based on contract information. Sometimes this option is simply not there.
The network mode is set as b / g / n or g / n mixture. The bottom line is that devices with different WiFi standards work depending on the network mode. That is, if you have an old phone or laptop, then you cannot connect to the modern standard of Wi-Fi. If you have a modern device, it can work to many standards.

Put the name of the wireless network next to it - this is the name of your Wi-Fi connection, for example, “My_WaiFay”.
The channel can be skipped automatically.

However, in this mode, manually change 7 or another selection method. This is because in our time there may be several routers nearby, for example in a high-rise building, and they can operate in the same area, which leads to difficulties.